Luminar 2018 Review | Is it for you?

As promised here is my Luminar 2018 Review.
The 2018 edition of Luminar is the latest from Developer Macphun (soon to be Skylum as they are no longer creating Mac only software) and is meant to compete with the likes of Lightroom and Affinity among other popular photo editing software. When I first saw an ad several months ago for Luminar I dismissed it as another attempt at competing with Lightroom or the countless other programs for processing RAW files. I am pleased to say after using Luminar for the past week I am VERY impressed. It's not perfect, but instead is a very powerful image editor that easily stands on its own. I could see how many photographers could make the switch from Lightroom or other image editors. Read on for an in depth review as well as a breakdown of the 50+ tools at your disposal.
Interface
When opening Luminar you are greeted with a splash screen similar to Affinity or Photoshop offering you options for Batch Processing or a Guide to help you begin.

Splash Screen

The main interface.
The main interface is a hybrid between Photoshop and Affinity. On the right you have your histogram and below that an option for Layers. Yes with Luminar you can work in real layers just like Photoshop or Affinity. What does this mean? You are no longer hindered to making global adjustments as in Lightroom. Want to only sharpen just a small part of the image? Add a layer mask to that specific "Filter" and paint where you want it to happen. Want to dehaze on just two sides of the image, add a gradient mask on both sides and your done. The upside to this is that it is as fast as Lightroom to make an adjustment but with the power and control of Photoshop.
I should clarify that a Filter is the same as an Adjustment.
**At first when experimenting with workspaces I changed workspaces from the default to the Professional and began adding new Filters. When the image seemed to lose all my edits from before I thought this was a major oversight and you couldn't keep them. I was wrong, after I changed workspaces all my edits were saved into a NEW layer directly under the Layers dropdown menu on the upper right. This is fantastic because you can make major edits to an entire layer, create a new adjustment layer and keep going or blend the two variations together. This creates endless opportunities for processing and leaves Lightroom in the dust.
Other controls (below) include a drop down "Tools" bar at the top which has Crop, Free Transform, Clone & Stamp and Erase tools. There is a history drop down menu top center to backstep through edits if you realize you've gone the wrong way with your edit.

Export options are top right (up arrow coming out of a box) and allow you upload to various online platforms such as 500px, Smug Mug or Facbook as well as other programs it detects on your system. Beyond that, the interface is very simple. When I first opened it at first, I thought there were not enough capabilities built in but after editing dozens of images I have yet to find a tool I didn't need.
What is missing is the option for Panorama Merge, HDR merge or smart edge detection when blending layers together such as what I often do for my Astrophotography. On that topic, I wanted to see how Luminar would handle a Milky Way image after merging several RAW files in Lightroom to a DNG. Once again I was impressed when working with a 25,000 pixel wide image and after making over a dozen adjustments Luminar was still snappy as ever. (below)

Color and Shadow/Highlight control made processing this panorama far easier than in Lightroom.
Ancient Bristlecone Pine Forest, California - USA
To be fair, I'm running a top of the line MacBook Pro 15" with maxed out RAM and fast QuadCore i7 Processor but even with this fast hardware Lightroom will still lag enough that I have to sometimes get up and get a cup of coffee. I could be wrong but this may be because Luminar was designed around the Metal API that Apple has been using for a couple years. I don't know if Adobe has made that change but it doesn't seem like it.
Filters/Adjustments
The filter catalog has controls broken down into easy to use categories and even includes a search function. There are five major groups each with many individual filters. The preset workspaces will have a set number of these that you can customize but also have the option to create your own custom workspace and set it as the default.


Essential, Issue Fixers, Creative, Professional and Utility together consist of 50 individual tools to do just about anything to your image. Below is a breakdown of each individual tool and how it can be used.
- The Essentials -
What you should start with
Accent AI - One of the key features of Luminar 2018, Accent AI is a complex automatic calculation of the image in realtime which adjusts highlights, shadows and contrast and saturation among others.
**In my experience it is one of the most effective tools in the program and possibly worth the upgrade alone. Especially for those new to editing.**
Saturation & Vibrance - Increases the intensity of colors in the image. Saturation increases all colors while vibrance increases only muted colors while ignoring those that are well saturated.
Structure - Effects image detail and clarity. This is one tool to get an HDR effect without bracketing shots.
Tone - A precise way to adjust global contrast and brightness.
Vignette - Darkens or Lightens the edges of your image. Two benefits to Luminar is you can adjust center brightness and have the option to place the vignettes center wherever you like.
Black & White Conversion - Includes luminance controls to adjust brightness dependent on each color. Also includes a color filter which simulates glass filters in front of the lens. When applied will brighten the specific color and darken the opposite color of the spectrum.
- Issue Fixers -
Bring out more detail in your image
Clarity - Adjusts overall clarity, and hardness between edges. Skylum Software says at high values halos may appear at the edges of the image.
De-haze - Uses contrast, color adjustments and clarity together to remove the effects of smog, haze, fog, or any other dense atmosphere that appears in your image.
De-noise - Removes image grain/noise from your image often caused by shooting at high ISOs.
Details Enhancer - Increases image sharpness while specifically working to not add halos or artifacts. This is a very capable sharpening tool miles ahead of Lightroom especially when paired with traditional sharpening which of course is another tool at your disposal.
Foliage Enhancer - Increases greenery automatically with the option to adjust the hue of the affected foliage.
Polarizing Filter - Increases color depth and works similar to the dehaze tool on haze, fog and similar effects. In my experience this is one of the best tools in Luminar and works incredibly well on water, specifically at low angles. Using this I was able to pull far more detail out of an older seascape than I ever had before even when adjusting highlights and other effects.
Remove Color Cast - Automatically detects incorrect casts and then adjusting the hue. There are two detection methods that work very well with a third option to choose the cast manually.
Sharpening - Focuses soft edges based on a radius you set to increase clarity and focus through contrast at the actual edges.
- Creative -
Add an artistic effect or change the overall look
Brilliance/Warmth - A similar adjustment to color temperature but more precise in that vividness can be applied.
Cross Processing - Creates an effect often used in film developing methods to create odd contrast shifts and color variations. There are color palettes that are based on cities around the world. I wish there were colors in the names as I can't be bothered to remember the effect based on the city.
Dramatic - A strong creative filter that increases contrast and lowers saturation and can be used to create a powerful cinematic look.
Fog - Essentially the opposite of Dehaze, this tool will soften and blur your image simulating the real thing. Used on the right image it can actually be pretty convincing.
Golden Hour - Adds warmth and softness to simulate sunset/sunrise.
Grain - Simulates analog film grain by adding randomized grain to the image.
High Key - Emulates this type of lighting setup which overexposes the subject through a single light source. Will create a contrasty bright image.
Hue Shift - Global adjustment for hue. **keep in mind this and all filters can be paired with a layer mask for far greater control**
Image Radiance - Creates a dreamy look through softening the image. It works by adding contrast and adding a creative glow specifically to the lighter ares of the image.
Matte Look - This works by creating a vintage look. It works by desaturating parts of the image and adding contrast.
Orton Effect - Simulates an effect of looking through cloudy glass to create a dreamy soft look. At the same time parts of the image are sharpened which creates a very powerful effect.
Soft Focus - Another soft effect designed to be added to portraits for an unusual effect.
Soft Glow - Creates a lighting effect in the brighter parts of your image.
Split Toning - One of my most used tools to get rid of color casts or add them to shadows and highlights. This is also a great tool when used on a black and white image to simulate warmer or cooler paper and inks.
Sun Rays - One of the highly advertised features of Luminar is the ability to add artificial sun rays. It works by intelligently detecting objects in your image and masking the light rays behind and around them. Its incredible to watch in realtime and when not overdone is very convincing.
Texture Overlay - Allows you to add in preloaded or custom textures (or images) to give a grungy look.
- Professional Filters -
Fix complex issues like color and lighting
Advanced Contrast - Adjusts tonal contrast within Highlights, Midtones and Shadows through midpoint adjustment which allows you to decide what parts of the image are treated as such. *This is probably my most used tool in this and other programs.*
Channel Mixer - Allows you to adjust the balance of the RGB colors and modify their values.
Color Balance - Allows you to specify what colors get added to specific tones. **This is my other most used tool in this and other programs**
Color Contrast - Allows control of the color range contrast gets added to. The color chosen will cause that color to become lighter while the opposite of the spectrum will become darker.
Curves - Allows you to brighten, darken, affect contrast and shift colors. Can be adjusted based on all channels or individual RGB channels for far greater control with up to 10 control points allowed.
Dodge & Burn - Tools that allow the addition of light or removal of it on specific areas. You will want to create a mask and use a brush with this tool to achieve better control and softer edges.
HSL - Hue, Saturation and Luminance of individual colors allow great control over your image. Hue changes the selected color to similar colors or shades. For example from Yellow to Orange to Red. Saturation increases their color purity and amount of selected color in the images. A higher value and more intense, a lower value and you will get back and white. Luminance can be used to brighten or darken the intensity of specific colors. **This is another one of the most used tools for my processing.**
LUT Mapping - Look Up Table mapping allows you to change the look based on film stocks or black and white looks. Using the .cube format you can import custom looks for very different effects, or create your own.
Microstructure - Adds a sharpening effect through small detail and texture. This is another tool to achieve a strong HDR look.
Photo Filter - Simulates color filter that would normally be attached to a lens. When used with a layer mask this can be an alternative way to simulate colored graduated filters.
Split Color Warmth - Used to adjust cool and warm tones in your image specifically . Used with saturation this is a great way to get better control over the vibrancy of your image.
- Utility -
Less common but still important tools
Adjustable Gradient - Allows adjustment of exposure, contrast, vibrance and warmth to 2 different areas of the image. This is a very powerful tool for fixing color issues in the sky and landscape.
Bi-Color Toning - Simulates a glass bi-color filter using a soft transition and multiple colors to tone the image.
Brightness/Contrast - Adjusts overall lightness and darkness and the difference between light and dark areas.
Color Temperature - Allows adjustment of more or less cool or warm light to fix color temperature.
Exposure - Adjusts the overall exposure of the image. Increasing will partially desaturate while decreasing will partially saturate the colors.
Highlights/Shadows - Allows the increase or decrease of light based on specific ares of your image.
Top & Bottom Lighting - Allows selective lighting at the top and bottom of the image without complicated masking or brushing. Great for adjusting sky and a darker landscape as is common when shooting a single RAW file.
Whites & Blacks - Affects the brightest and darkest areas of the image by moving the black point.
As you can see, there are more than enough tools to work with. After hours and hours of working on image I never needed to go to another program with the exception of merging files into a Panorama. The toolset provided gives me confidence in leaving Lightroom once the DAM functionality is added.
Below are several edits I made while reviewing Luminar followed by some Pros, Cons and a wishlist for future updates.
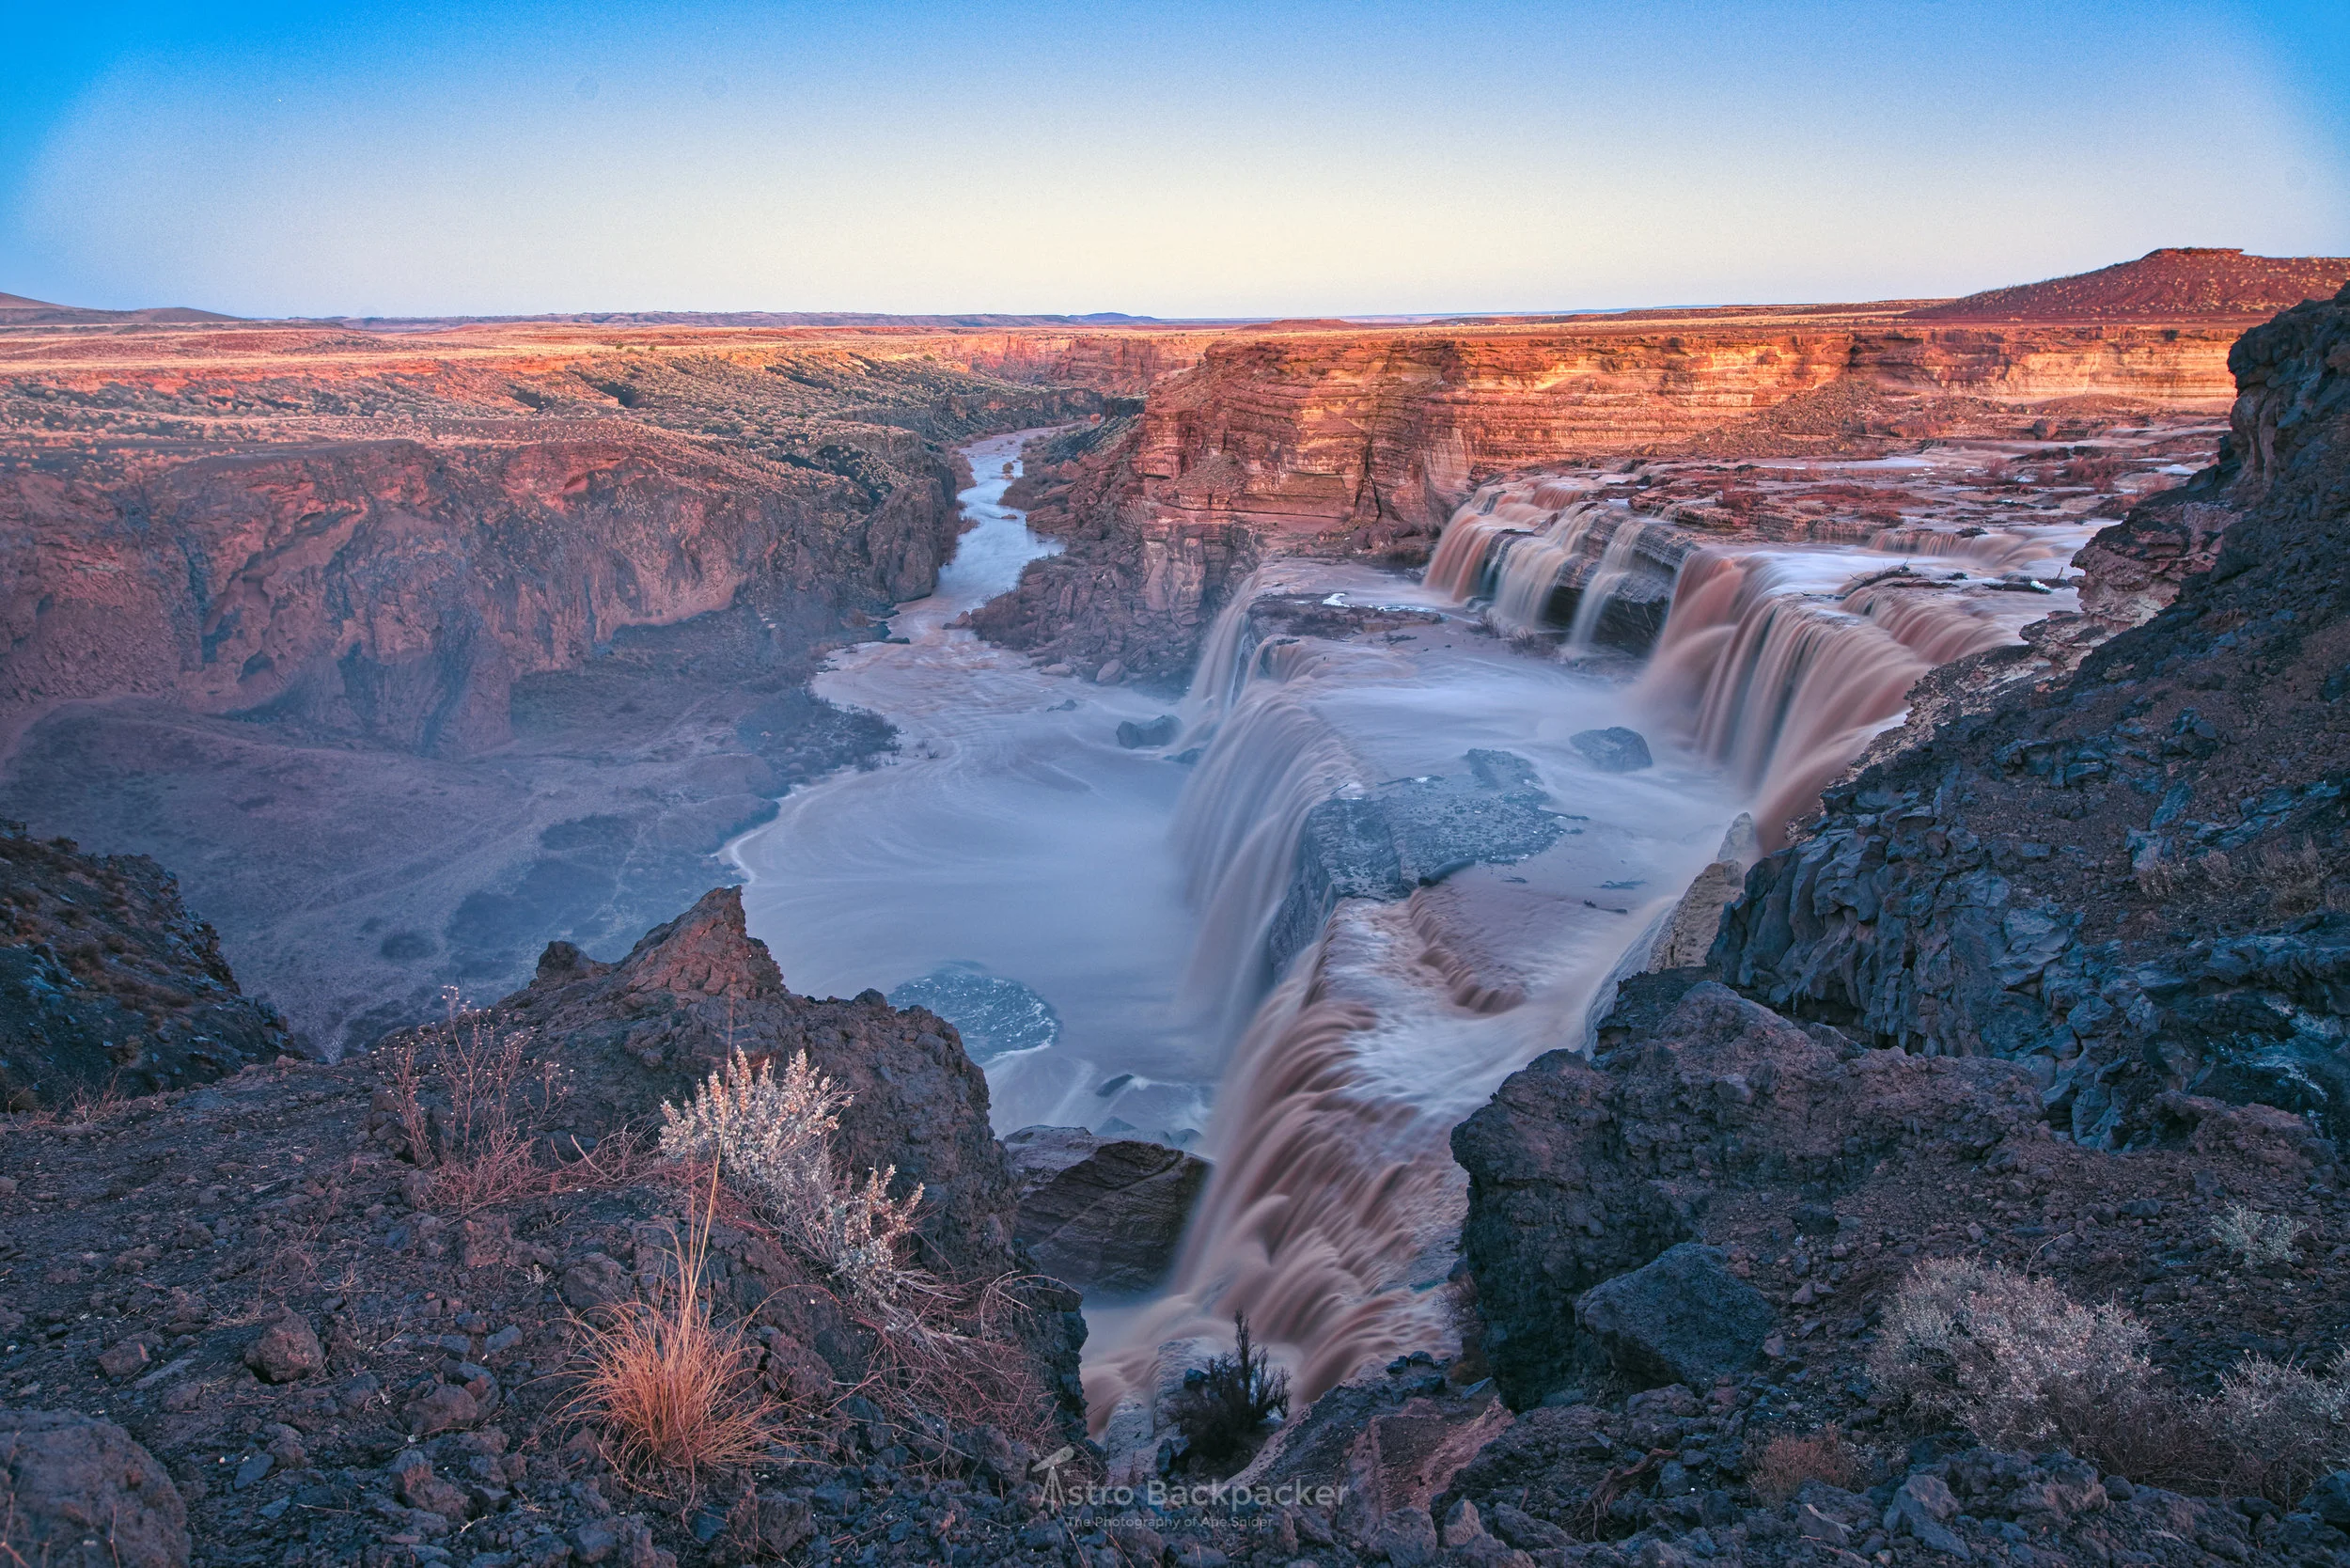
Dodging and Burning and the Advanced Contrast made a massive difference in this image at Grand Falls, Arizona.

Is the sun at the top natural or artificially added using the Sunrays? What do you think? Monument Valley, Utah

The Sun Rays were added but look at how bright and colorful the grasses are. In Lightroom I struggled to keep the rest of the image looking good while keeping too much contrast at bay.
Hart Prairie, Arizona

An example of how useful the vignette tool is compared to Lightroom as well as color and contrast control. I have always struggled to process this image but with Luminar it was a breeze.
Metallic Starling in Daintree - Cairns, Australia


The left image above is after processing in Luminar an older Canon Raw file out of my 6D I took in Phuket, Thailand. The right image is processed to best of my abilities in Lightroom. Look at how much detail I was able to pull out of the water in the upper right thanks to the Polarization filter.
Phuket, Thailand

Again, here is a great example of how powerful the color balance and color cast tools are. This image was plagued by reds in the background that were difficult to remove before.
Haast, New Zealand

Again, artificial sun rays. They look pretty realistic to me.
West Coast, New Zealand


This image I took in the Northern Arizona Volcano Fields has always been one of my favorites with such a great view of the San Francisco Peaks in the background but since I captured it under such harsh lighting conditions it was always a bit on the contrasty side. Using tools in Luminar I was able to manage that contrast better and create a far better image Look how the haloing is gone from the upper left around the edges of the trees. (Left image is Luminar and right image is Lightroom)
SP Crater, Arizona

A seascape on the south coast of Wellington, New Zealand. The harsh lighting conditions and moody clouds made this image one I've wanted to share but issues in the sky and haze on the rocks made me hold back. By adding the artificial sun rays and pulling back haze and more details in the rocks this image is now what I've wanted it to be. This is the biggest reason I don't delete RAW files. You never know what capability is going to come in the future to help you with your images.
Wellington, New Zealand
So, what did I like and dislike? Below are some pros and cons and a few things I would love to see added.
Pros:
- Highly customizable interface ranging from preset menus for the beginner which includes: Develop, Accent AI, Saturation, Polarizing, Structure, Curves and Vignette. The Pro Workspace includes: Develop, De-noise, Accent AI, Dehaze, Remove Color Cast, Advanced Contrast, HSL, Split Toning, Structure, LUT Mapping, Saturation, Polarizing, Curves, Dodge and Burn and Vignette. Of course all these can be removed or added to workspaces from the lengthy list of capabilities.
- For those of you using the new MacBook Pro with Touch Bar, Luminar has outstanding support for it. It becomes very natural reaching up from the keyboard and quickly adjusting the size of the brush, turning on or off filters, seeing before and after effects, etc.
- Performance is very good when working with large RAW files. I mostly processed Sony a7R ii files which range from 40-80 MB each and Luminar had no issue or lag working with them.
- Highlight and Shadow recovery seems much better than Lightroom.
- 5 Hours of continuous editing and not a SINGLE CRASH, FREEZE, OR ISSUE. Take that Adobe. This is version 1.0.0 and its that stable. AS IT SHOULD BE.
- Many of these tools are absent from Lightroom such as real Color Balance as in Photoshop, LUT mapping, Dodge and Burn, Advanced Contrast to name just a few.
- Sun rays are AWESOME but you can easily overdo it. They magically sense objects in your image and in real time disperse light realistically behind branches, buildings, objects, etc. If you do not over do it they are VERY realistic especially when you customize color, size and scatter.
- Includes many key features that are in Photoshop or Affinity for tweaking your image in more precise ways compared to other programs such as Microcontrast, Color Balance and Advanced Contrast.
Cons:
- No Panorama Merge, HDR Merge.
- No Smart Edge Detection when blending layers.
- Each image you open becomes its own window. There is no tab system or way to work with multiple images in the same master window. This became frustrating when going back and forth from Lightroom opening new images every few minutes.
- No watermark capability or option for adding any text at all. I'm told this is coming in a soon to be released update.
- No DAM (digital asset management) capability but again this is supposed to come very soon. This is the biggest feature I want to be added so I can ditch Lightroom. Years ago Adobe enticed us with monthly payments for software that was supposed to constantly transform and receive new features, etc. How many times has Lightroom or PS been updated in the last 24 months (besides a simple bug fix?) My count is twice. When Luminar gets this capability unless it is bug ridden (which I doubt based on this release) I will have no need for Lightroom. My main use for it is to catalog my 150k+ image library from the past decade.
- Saving/exporting files is unusually slow. As in often upwards of a minute for a simple 42mp file. Hope this gets fixed soon.
- I can't think of any other complaints. :)
Good Job Skylum, I'm impressed. While not perfect they have created a very powerful image editing program with a very simple to use interface and more tools than you will know what to do with. With a few updates and tweaks to performance this could be one of the leading stand alone image editors out there. And its cross platform so Windows users can get on board too.
Wishlist:
- I hope that Skylum decides to bring Panorama merge support when the DAM functionally gets added. If that happens this will be my one stop shop for nearly all processing.
- It would be cool to be able to work with different images in the same window, but I'm sure this is coming with DAM support.
- A community space built into the app would be cool to share edits and preset you've created.
- More optimization for top end hardware.
- Add a loupe when sharpening so you don't have to zoom into the full image on the main view.
- Move the add filter window to the left side of the screen as it currently blocks a significant part of the image when it is brought up.
Well, thanks for reading, if this helped you drop a comment below! Stay tuned for more blog posts soon, I've been so incredibly busy this year producing a lot of new work, doing a ton of art shows and putting out two new calendars now available for purchase. Tiffany and I have also been working on our Tiny House every chance we get. Soon the Tiny House will be finished and I will have more time to write posts. Until then!
-Abe
** This Review was written based on software I purchased with my own money and did not receive anything from Skylum Software for writing it. **
All Images and Words © Abe Snider 2017